Skip to content
OCEE documentation
OCEE documentation

Administration

This page describes how administer an OpenCms cluster using the OCEE cluster manager.

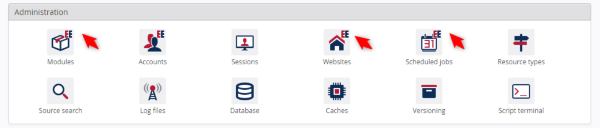
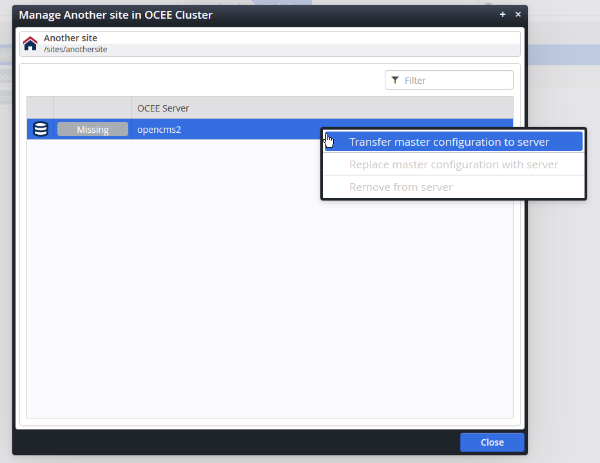
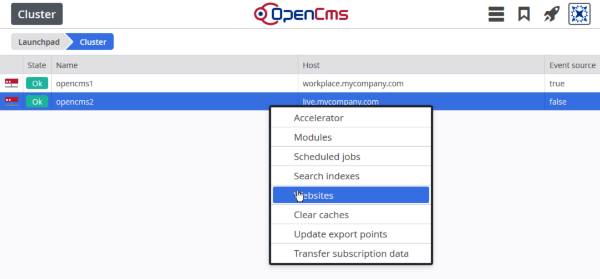
While the cluster manager propagates messages about changed resources or users to other cluster servers, it does not transfer any configuration changes. This has to be done manually, but the cluster manager provides some tools in the workplace for transferring changes in the configurations for:
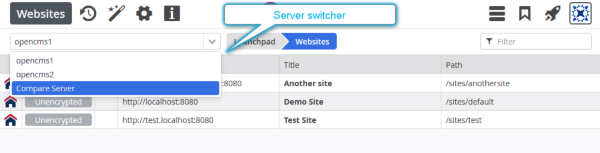
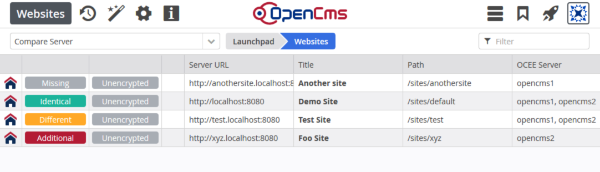
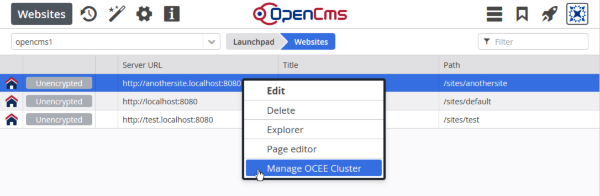
  • Websites
  • Modules
  • Scheduled Jobs

Rather than being completely new workplace apps like in older OCEE versions, these functionalities extend existing apps in the OpenCms workplace. The extended apps are recognizable by the letters "EE" (enterprise extensions) being overlaid over their normal icons (note that the "EE" on the Accounts app in the screenshot is related to the LDAP connector, not to the cluster manager).


2019-07-30_16h05_05

For all of these, the following actions are available:

  • Transferring items (jobs/modules/website configurations) from the workplace server to a slave server
  • Transferring items from a slave server to the workplace server
  • Deleting items on the slave server
  • Getting an overview about how items differ between different servers

The following section describes how these things are done in the case of websites. The user interface for the other two types of configuration is very similar, and only the differences between them and the website case are described.


To look at the websites for a given cluster server (again, the principle is the same for modules and scheduled jobs), you can use the site management app and select a cluster server using the server switcher in the top left. When you select a server, only the sites configured on that server are displayed. Websites on other cluster servers can also be edited and deleted.


2019-07-31_09h13_36

In addition to the cluster servers, the server switcher has an additional entry "Compare Server". This can be used to get an overview of the differences in configuration between the master server and the slaves.

2019-07-31_09h27_21

The table in the "Compare Server" view shows all items (sites/modules/jobs) that are available on any of the cluster servers, with a tag describing how different the configurations are between the servers. The tags are:

  • Identical: The item is present and identically configured on all servers.
  • Missing: The item is configured on the workplace (master) server, but not all of the slave servers.
  • Different: The item is present on the master and slave servers but configured differently.
  • Additional: The item is present on some of the slave servers, but not on the master server.

An additional table column shows on which cluster servers the item is present.

Note that in the case of more than two cluster servers, the tags are not specific; they tell you that something is different between the servers, but not specifically on which servers.

To transfer items between cluster servers, use the "Manage OCEE Cluster" context menu item from the table (it can be used both in the table for one of the cluster servers and in the "Compare Server" table described previously):

2019-07-31_10h22_02

Then the "Manage ... in OCEE Cluster" dialog opens:

2019-07-31_10h47_32

At the top of the dialog, the configuration item we opened the dialog for is displayed.

The main part of the dialog is a table which shows the status of the configuration item for each individual cluster server except the workplace server. The status tags are used again here, but are specific for the cluster server:

  • Identical: The item exists both on the workplace server and on the slave server and is identical on both
  • Missing: The item is missing on the specific cluster server
  • Different: The item is configured differently on the slave server than on the workplace server
  • Additional: The item is configured on the cluster server but not on the workplace server

In the table, you can use the context menu to transfer configuration items. The context menu has three options, some of which may be disabled depending on the status:

  • Transfer master configuration to server: Copies the configuration item from the master (workplace) server to the slave server
  • Replace master configuration with server: Copies the configuration item from the slave to the master server, overwriting it if it already exists on the master
  • Remove from server: Removes the configuration item from that cluster server

In some cases it is also possible to edit the remote configuration, however this functionality is different for the different types listed above:

  • Websites: can be edited for remote server
  • Scheduled jobs: can be edited for remote server
  • Modules: Only module parameters can be edited for remote server

To access these edit options, switch to the server for which you want to edit the configuration in the appropriate tool, select the item you want and choose "Edit" from the context menu ("Edit parameters" for modules).

The cluster manager also extends the "Search indexes" app with the ability to switch between different cluster servers. This allows you to look at what search indexes are configured on different servers and to rebuild them if necessary.

2019-07-31_11h29_54

Again, the server switcher in the top left allows you to switch between different servers.

The cluster overview shows you the list of configured cluster servers with their current status and allows you access functions related to one of the servers directly from its entry in the list. 

To access it, use the "Cluster" app from the launchpad:

2019-07-31_11h38_10

This will lead you to the cluster overview screen:

2019-07-31_11h59_13

A list of the configured cluster servers is shown. For each server, the status is shown, which can be

  • OK: if the cluster can connect to the server
  • Disconnected: If the cluster can not connect to the server

The context menu for each server has the following entries:

  • Accelerator: Opens the OCEE Accelerator cache statistics for the server
  • The following options behave the same as if you went to the corresponding app in the launchpad and then switched to that server:
    • Modules: Opens the module management for the server
    • Scheduled Jobs: Opens the scheduled job management for the server
    • Search indexes: Opens the search index overview for the server
    • Websites: Opens the site manager for the server
  • Clear caches: Sends a "clear cache" event directly to the server, which causes it to clear its core cache. The "clear cache" event is normally triggered when you use the "Clear core cache" functionality from the cache app. When triggered that way, the event is propagated to all servers. But when triggered via the context menu option in the cluster manager, the event is just sent to the selected server.
  • Update export points: Triggers an export point update for all modules on the selected server
  • Transfer subscription data: Transfers the subscription data from the ocee-license.xml of the workplace server to the selected server

The cluster manager ships with an extended version of the CmsShell. To start the extended CmsShell, execute the ‘cmsshell.bat’ / ‘cmsshell.sh’ script inside the WEB-INF folder of your workplace server with an additional parameter:

./cmsshell.sh -additional=org.opencms.ocee.cluster.CmsClusterShellCommands

Starting the shell in this way, the following shell commands are available in addition to the regular shell commands:

  • importClusterModule {import file path}
    Imports the specified module into your workplace server. The appropriate events will be transmitted to all other cluster servers. On all servers the module configuration will be available, the JSP-repository will get purged and the module export points will get written.
  • importClusterModuleFromDefault {import file name}
    Imports the specified module from the default directory (WEB-INF/packages/modules/).
    (see importModule)
  • deleteClusterModule {module name}
    Deletes the specified module from the workplace server and all other cluster servers.
  • updateModuleConfiguration {server name} {module name}
    Transfers the module configuration of the given module to the given cluster server.
  • replicateVfs {target server name} {folder path}
    Starts a full replication of a folder to a given cluster server. Only available if the
    replication module is installed and configured correctly.
  • replicateAccounts {target server name}
    Starts a full replication of account data to a given cluster server. Only available if the replication module is installed and configured correctly.
  • setAutomaticReplicationLocked {“true”|”false”}
    If “true” is passed as a parameter, automatic replication after publishing will be disabled, otherwise it will be reenabled. This is not saved in the configuration, so it is only effective during the run time of the CmsShell. Only available if the replication module is installed and configured correctly.